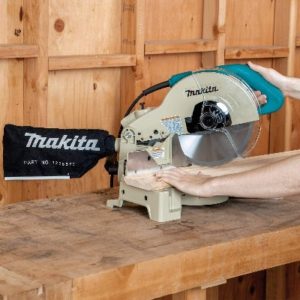
A Miter saw is usually on the list of necessary power equipment for any woodworking store. It is user-friendly, quick to cut, and handy for trimming windows, making picture frames, and projects needing accurate 45-degree miter cuts. However, there are variations to the tool, and insight into What Does Dual Bevel Mean On A Miter Saw will help choose the best.
Generally, a dual bevel miter saw has a beveling head rotating in both directions, left and right. Therefore, a double bevel allows you to make cuts in both directions. Also, this attribute is beneficial as you can make identical bevel cuts without turning the material around.
A dual bevel miter significantly improves workflow and efficiency for both contractors and highly committed hobbyists. So, check out this guide for delivering bevel cuts with single and double bevel devices.
Table of Contents
Single Bevel Miter Saw Vs Dual Bevel Miter Saw
Both single and dual miter saws make miter and bevel cuts and use circular blades to cut materials. In addition, you can also call them compound miter saws as they can make cuts in one or two directions.
Despite these basic similarities, the saws are pretty different. So, check out the detailed discussion below to earn more about the tools.
What Is a Single Bevel Miter Saw
A single bevel miter saw only allows you to make one-directional cuts. Thus, it adjusts its positioning in one direction; to the right or the left. Also, it can create miter and bevel cuts together or independently.
The device requires you to make bevel cuts on the lumber’s sides. Furthermore, it only makes cuts in one direction. Hence, you’ll have to turn the material around to get a traditional angle cut on the wood’s other side.
Lately, you can still create the same cuts as a dual bevel, despite working with the single bevel miter saw. Moreover, although you’ll need more brainpower and the process will need more time and effort, you are sure to make multiple cuts on the workpiece.
Advantages and Disadvantages of a Single Bevel Miter Saw
 Single bevel miter saws are easy to use and ideally suited for home improvement DIYs and beginner artisans. Besides, you can consider them when looking for a lower maintenance tool.
The saws are cheap and typically a few hundred dollars more affordable than their dual counterparts of the same brand. They are also straightforward and easier to use for your 90-degree angled cuts.
The miter saws are excellent for professionals as you can accomplish the same outcome as with a dual bevel device. All you need is more brain power, time, and energy.
Nonetheless, single bevel miter saws have some drawbacks. For instance, they have fewer capabilities. The tools only make one-directional angled cuts, meaning you’d have to turn the wood around to deliver matching cuts.
You may also have difficulty getting professional cuts when installing crown molding and other trim applications.
A single bevel miter saw cannot make double cuts. Therefore, matching bevel cuts on the workpiece’s sides may not appear uniform, compromising your professional and flawless look.
Finally, you’ll need to extend the project duration when trying to make dual cuts with a single bevel miter saw. And more intricate projects demand more creativity to deliver a satisfactory outcome.
What Is Dual Bevel Miter Saw
You can also call the tool a double bevel miter saw as it adjusts to make cuts in any direction. Moreover, unlike its single bevel counterpart, the saw moves to the left and right, allowing you to undertake more projects.
The saw’s head rotates on a fulcrum toward the right and left directions. Hence, you can make identical bevel cuts on the wood without turning it around.
In addition, the tool makes it easy to make precise and uniform cuts on both sides of the material. So, you are sure of an efficient and quick working time, thanks to faster repetitive cuts even on long wood pieces.
Advantages and Disadvantages of Dual Bevel Miter Saw
Most advanced woodworkers and professional contractors prefer double bevel miter saws. So, here are some advantages of investing in the tool.
These dual bevel miter saws allow you to take on more projects since they efficiently cut the material in both directions. Also, this is a vital attribute for crown molding and trim applications.
You can meet tight deadlines as the tool can make bevel cuts in multiple directions. Besides, you do not need to keep rotating the device, meaning you will do more faster and save time.
The saw’s ability to rotate its head facilitates more precise and uniform cuts on the workpiece. Therefore, it will improve your work’s quality.
However, it is prudent to consider some of the tool’s cons when selecting the right miter saw for your application. Otherwise, you may end up with an incompatible device and mess up your materials.
Typically, dual bevel miter saws are at least $100 more than the single bevel ones from the same brand. Therefore, it is prudent to evaluate the return from the investment before purchase.
The saws are more complex to use as they feature more extensive capabilities. In addition, they are most suited for expert projects such as crown molding. So, they are not ideal for amateurs.
What Is the Difference Between a Bevel and a Miter?
It is essential to focus on making the correct angles on wood projects. However, sometimes, you will need to create more complex shapes for your woodworking. Therefore, it is time to add exciting details to your project with angled cuts: bevels and miters.
A bevel is an angled cut, usually relative to the material’s face. You achieve this shape by making the bevel cut along the entire side of the plank or cutting at the end of the wood.
In contrast, a miter is an angled cut relative to the material’s square side. You will find it mostly on wood picture frames and related projects.
You may not be able to immediately distinguish between these two cuts just by looking at them. You need a closer look, and one way to tell a bevel from a miter is by evaluating where you cut.
You will observe the cut angles on the wood’s faces for miters while the bevel cut is right along the material’s edge. Besides, the joined wood pieces create the miter joint for a complete outcome. So, it is possible to identify each cut.
Also, miter cuts come about after pressing the tabletop flat at an angle, whereas bevels require you to adjust the blade at an slunt position to the wood’s top surface.
It is prudent to be sure of the miter saw’s sharpness when working on a miter. Otherwise, you may not get a smooth, precise cut. Moreover, you won’t have to apply extra pressure or force the wood for a proper outcome.
Please note that a blunt miter saw blade can leave burn marks on the workpiece. Further, you will deliver an uneven surface and eventually compromise the intended look.
Thus, consider working with a sharp saw to provide a tight fit for wall corners, door frames, and similar pieces.
Also, sometimes, you may have to use the available pieces and tweak them to deliver an excellent fit. Plus, remember that we always leave room for adjustments in woodworking projects depending on the wood.
Miters are often suitable for making seals, doors, boxes, windows, and picture frames. You can even consider working with top-notch sliding compound miter saws for a professional result.
On the other hand, bevels are perfect for carpentry and welding projects. They also come in handy when safety is a priority, and you need to join wood pieces in geometrical shapes.
Thanks to their complimentary angels, bevel cuts give pieces a more appealing appearance. They can even overlap slightly and appear as a single piece, providing a more unified and sturdier look.
In addition, these cuts are most suitable for most welding applications as they provide better support for joints. So, you are sure of a more robust structure that can withstand heavier loads.
Unfortunately, it can be challenging to create a perfect bevel when using hand tools. Some gauges for this equipment may not meet the required accuracy for smooth bevel cuts. So, it is better to consider using power tools for a better outcome.
A protractor can help confirm the angles for accuracy when working with hand tools. But set up the fence first to tilt the blade away and avoid kickbacks. Also, unplug the saw when using the accessory for guaranteed safety.
Both bevels and miters are angled cuts and easy to make without compound miter saws. It is possible to create them with a humble circular saw and expect a successful outcome.
Besides, most circular saws feature a pivoting base that allows bevels cuts. In addition, miter cuts are simply angled variations of straight cuts. Therefore, you do not need a lot of expertise to create them.
Nonetheless, the angled edges are challenging as the cut surfaces may not line up as expected. Also, the problem multiplies when you try to create squared boxes with miter edges.
So, check out a few strategies to minimize your errors and make clean cuts.
-
Bevel Without a Table Saw
It is easy to make a bevel with a circular saw, and almost every circular cutting device features a tilting base plate. Moreover, the thumb screw in front or behind the blade and off to the side helps loosen the tilt.
You can tilt the base with a rough accuracy degree for a successful result. Also, most bevels work best for trim applications, not for joining intricate pieces. Therefore, you don’t have to stress over precision.
It is advisable to adjust the blade depth a little deeper than the cut’s thickness once you deliver the correct angle. Use the catch to move the baseplate up and down and expose the blade more or less.
Please avoid extending the entire blade when cutting. Otherwise, having a more exposed edge than necessary is a hazard. In addition, the accessory will hide under the workpiece, making it easy to accidentally cut into the worktable, the power cable, or even yourself.
You can make a straight and uniform bevel without using a table saw or fence. However, you’ll need to create a fence along the wood’s side by accounting for the baseplate’s and blade kerf’s width.
Consider clamping or holding the structure with heavy-duty double-sided tape to help stabilize your work. Further, although clamping takes more time to set up, it will deliver more stability.
It is easy to run along the lumber to create a bevel. Only ensure that you set up the circular saw correctly. Also, position your work for the cut-off portion to fall away from the material.
-
Miter Without a Table Saw
Cutting a miter using a circular saw is similar to making a straight cut. The only difference is that we are cutting at an angle. Therefore, measure and mark the miter using a pencil on the wood’s face.
It is also best to fence along the angled cut line. But remember to offset the distance of the blade kerf and circular saw base plate on the wood’s side you wish to keep. This way, the cut-off portion falls away.
Finally, clamp the lumber on a sturdy workbench and cut the miter. You should deliver an accurate and clean cut with minimal tear-out once the fence is correct.
-
Cleaning Bevels
Bevels can become irregular even after double-checking everything. Moreover, uncut wood areas produce thin wood fins. But they are easy to resolve with small trimming planes.
The plane features a flat and level bottom with small cut-outs and a protruding sharp blade. It resembles a shaving razor, except that you can control what blade length to expose. However, experts recommend that you with a small blade area, then work your way up to uncover more.
Run the wood planner in the wood grain’s direction with the base positioned flat against the surface. In addition, ensure that the blade faces forward and moves in one smooth motion.
There is nothing to worry about as the wood curls when shaved correctly. Furthermore, hand planes are not just for corners, and you can use them on relatively flat material. They also help to level high spots on the surface.
-
Truing Up Miters
You will notice that the miters do not line up after a few cuts despite checking with a square. But it is possible to guarantee a better result by clamping the sander onto a bench vise to achieve maximum stability.
Further, use 150-grit sandpaper on a sander and carefully press the miter to facilitate leveled contact.
This idea helps to even out slight variations from the miter and deliver a better fit. Also, go slow on the project and check for squareness frequently. Eventually, you will get a square frame and tight miter.
-
Filling Miter Gaps
Flip the frame over to ensure the front faces upwards. Then, check for any gaps that sanding could not conceal and use sawdust and glue to act as a filer. In addition, you can apply adhesive to the opening and use a stiff card or toothpick to force it into the hole.
You can apply another glue layer on the surface when necessary, as sawdust is excellent at absorbing moisture. Next, keep the wood tight with a clamp and allow the glue to dry overnight before sanding.
-
Sanding and Finishing Miters
Start with coarse sandpaper of about 100 grit, paying attention to the transition between joined materials and corners. Then, work your way up to higher sandpaper grits. However, reapply the sawdust and glue if the sanding reveals gaps on the surface.
Use 220-grit for the finishing stage. In addition, clean off the frame to remove debris and dirt with a lint-free rag or tack cloth.
Although miters and bevels add fantastic dimensions to woodworking projects, they are challenging to create for beginners. Nevertheless, you’ll soon become a master within no time as practice makes perfect!
How to Use a Dual Bevel Miter Saw
Using a dual bevel miter saw is similar to working with its single counterpart. But there are a few things to keep in mind.
Measure twice or thrice and cut once as you can always trim longer boards. But can’t add length back. Besides, you need extra time to guarantee a precise cut when working with bevel cuts on both ends of a piece.
Consider flipping the saw around. This step requires you to reset the device for an opposing bevel cut, especially when working on both boards’ ends. You can also use a digital angle gauge to get the exact angle every time you move the cutting device.
Using Dual Bevel Miter Saw:
Do I Need A Dual Bevel Miter Saw?
You need a dual bevel miter saw when the project requires multiple double cuts in different directions. Moreover, it makes installing baseboards throughout the house more manageable and effective.
You can use a single bevel miter saw for the above task, but it is more energy and time-consuming. Therefore, a dual saw allows you to make accurate cuts simply and logically.
In addition, the tool works on both sides of a workpiece and guarantees uniform, professional cuts. It also accommodates repetitive cuts on longer workpieces and is thus a perfect choice for highly committed DIYers and contractors.
Why Should You Never Pull Cut On Sliding Miter Saw?
Sliding miter saws work when cutting on the push strokes. Pulling them through the cut leads to a climb cut and causes the blade to rise from the material and chase after you.
In addition, using a blade with teeth angled forward between zero and five degrees is advisable. The teeth’ positive hook is aggressive enough to push through the lumber and maintain control. Therefore, you do not have to pull a cut on the sliding saw.
Lastly, a blade with a more aggressive hook is harder to work with and control, whereas one with teeth angled backward requires too much force.
Frequently Asked Questions
Here are some of the most common question around the subject:
-
Which Blades Can I use With a Miter Saw?
The answer depends on whether you use a single or dual miter saw. Furthermore, the saws are versatile woodworking accessories ideal for multiple circular blades. Thus, it is advisable to pick the best blade option for your work.
We have two primary blade types for miter saws: crosscut and combination blades. Typically, miter saws are ideal for crosscutting, and no wonder the tool needs a good crosscut blade. In addition, it is best to get an edge with a high tooth count for smoother cuts.
On the other hand, combination blades are an excellent alternative when working with multiple materials. They allow you to deliver smooth cuts in surfaces other than lumber.
Finally, ensure that you choose a high-quality blade for your miter saw. It assures you longevity and better performance.
-
Is a Dual Bevel Miter Saw Worth It?
A dual bevel miter saw is worth the money when making multiple bevel cuts. Besides, using a single bevel saw for more extensive applications will likely result in mistakes and frustration.
The saw is also perfect when working with limited workshop space, and you want to cut board ends in both directions.
However, your opinion will vary depending on how frequently you create bevel cuts. In addition, a single bevel miter saw is perfect for an average homeowner.
Conclusion
Consider equipping your woodworking shop with a dual bevel miter saw to broaden your experience and increase project complexity. It will cost you more but is certainly an alternative worth considering. In addition, follow the discussion above for more information on the tool.
What Does Dual Bevel Mean On A Miter Saw
A dual bevel on a miter saw lets you make uniform and accurate cuts on both sides of your material. The bevel tool features a rotating fulcrum to facilitate identical bevel cuts on the workpiece. Therefore, you work faster with repetitive cuts on longer pieces.

Tyron Otieno
Tyron is an avid woodworker and writer. He founded this website to help other woodworkers, whether hobbyists or professionals by sharing his knowledge and experiencie after a decade of woodworking.